Quick Answer
An Ethernet cable has 8 individual wires, each terminating on a specific pin inside the RJ45 connector. A cable tester sends a signal through each wire and verifies it arrives at the correct pin on the other end. This catches opens (disconnected wires), shorts (wires touching each other), miswires (wires on the wrong pins), and split pairs (wires that test correct for continuity but are physically paired wrong).
Testing takes seconds and should happen after every termination. A cable that looks perfectly crimped can still have a wire that didn't seat into the connector, a split pair that will fail under network load, or a pin swap from a momentary lapse in concentration. The tester catches all of it.
- Both ends, every time. Plug the main unit into one end and the remote into the other. Testing one end alone checks nothing but the tester's own self-check.
- A pass is 8 LEDs, in order, on both sides. LEDs 1–8 light sequentially on the main unit and the remote. Anything missing, out of order, or on the wrong side is a fault.
- Read the fault, then fix it. A dead LED is an open, two swapped LEDs is a miswire, two lit together is a short, and swapped pairs is a split pair. Cut the bad end and re-terminate.
- Never test into live equipment. Disconnect both ends first — a wire-map signal into a switch gives false reads and can damage gear. Use a tone generator for live tracing.
- A wire-map pass isn't a speed pass. For Cat6A / 10-gig you need more than continuity. A speed test is the next step and a 10G certification verdict takes a certifier, and we sell neither instrument.
What a Cable Tester Does (And Why You Need One)
A network cable tester is a two-piece tool: a main unit and a detachable remote. You plug one end of your cable into the main unit and the other end into the remote. The tester then sends a small electrical signal through each of the 8 conductors one at a time and checks three things:
- Continuity - is each wire physically connected from one end to the other? A wire that's broken or not seated in the connector will show as an "open."
- Correct pin mapping - does wire 1 on one end connect to pin 1 on the other end? A wire terminated on the wrong pin shows as a "miswire" or "reversal."
- No shorts - are any wires touching each other? Two conductors making contact where they shouldn't shows as a "short."
Without a tester, you're relying on the cable either working or not working once you plug it into a switch - and "not working" tells you nothing about what went wrong. A tester tells you exactly which wire has the problem, so you can fix it in seconds instead of re-terminating the entire cable blind.
If you crimp your own cables, a cable tester is not optional equipment. It's the verification step that separates a professional termination from a guess.
Types of Cable Testers
Cable testers fall into three categories, each designed for a different level of verification. The type you need depends on what questions you need the tester to answer about your cable.
Wire Map Testers (Basic - $30 to $100)
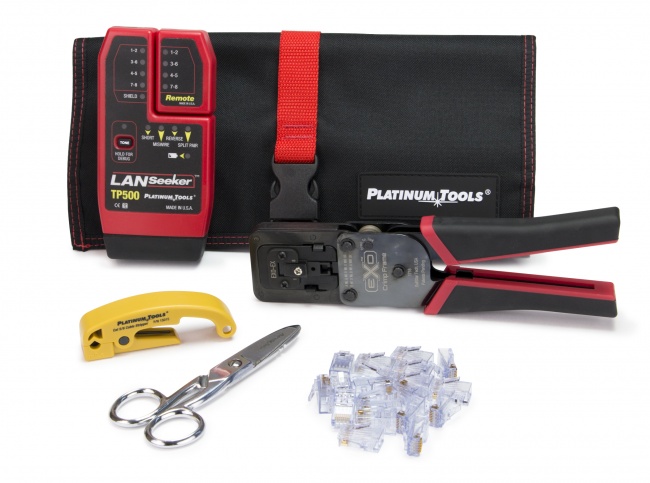
Wire map testers check pin-to-pin continuity. They verify all 8 conductors are connected and wired to the correct pins. This is the minimum level of testing and catches the most common termination faults: opens, shorts, miswires, reversals, and split pairs. Tools like the LanSeeker ($80.08) fall into this category - one-button operation, LED readout, pass or fail in two seconds.
This is the tester most people need. If you're making patch cables, pulling cable through your house, or doing any RJ45 termination work, a wire map tester verifies your work.
Qualification Testers (Mid-Range - $100 to $450)
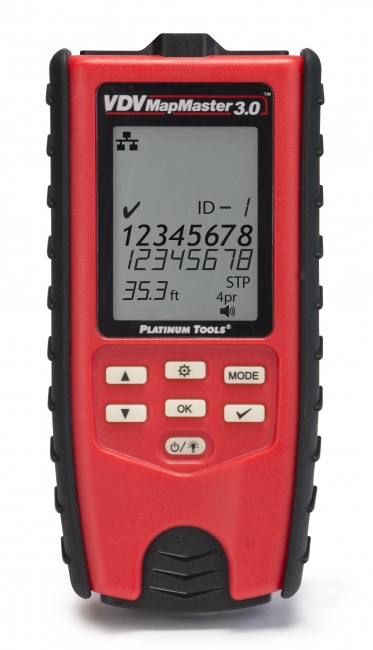
Qualification testers do everything a wire map tester does, plus they measure cable length and identify cable runs by number. The VDV MapMaster 3.0 ($168.14) adds length measurement, distance to fault, numbered drop identification, and an end-to-end shield check on shielded cable that a wire map test will not see.
These are for professional installers who need to document their work, troubleshoot existing installations, or manage structured cabling with dozens of runs.
Certification Testers (Professional - $500+)
Certification testers measure actual electrical performance: crosstalk, return loss, and insertion loss. A step below sits the speed certifier, which proves the link carries traffic at a target rate but does not produce a TIA-568 certification result. Both classes are for commercial contracts, data centers, and any project where you have to prove performance rather than connectivity, and neither is a tester we sell. Our lineup ends at the qualification tier above.
For a deeper comparison of every tier and specific product recommendations, see our complete guide to choosing a cable tester.
How to Use a Wire Map Tester: Step by Step
This procedure applies to basic wire map testers like the LanSeeker or VDV MapMaster 3.0. The specifics of your tester's interface may differ, but the fundamental process is the same for all wire map testers.
Disconnect the cable from all equipment
Both ends of the cable must be unplugged from any switches, routers, patch panels, or devices. A wire map tester sends its own signal through the cable - having it connected to active equipment can give false results and may damage the equipment or tester.
Detach the remote from the main unit
Most wire map testers ship with the remote attached to or stored inside the main unit. Separate them. The remote is the smaller piece that plugs into the far end of the cable.
Plug one end of the cable into the main unit
Insert the RJ45 connector into the RJ45 jack on the main unit. You should hear the connector click into place. The main unit is the piece with the power button, battery, and LED display.
Plug the other end into the remote
Take the remote to the far end of the cable and plug it in. For short patch cables, the remote will be right next to you. For in-wall cable runs, the remote will be at the other end of the run - at the patch panel, wall plate, or wherever the second termination is.
Press the test button
On the main unit, press the test or power button. The tester will send a signal through each conductor in sequence and display the results on the LED panel. The entire test takes 1 to 3 seconds.
Read the LED pattern
Watch the LEDs on both the main unit and the remote (if the remote has its own LED display). A good cable will light LEDs 1 through 8 in sequential order on both sides. See the results interpretation section below for what each pattern means.
Before you start the real testing, run a test on a short factory-made patch cable you know is good. The tester should report a clean wire map. If the verification cable fails, the tester is the problem, not the cabling — power-cycle it and try again before you troubleshoot a single field cable.
Understanding Test Results
The LED pattern on your cable tester tells you exactly what's happening inside the cable. Here's how to interpret what you see.
What a Passing Test Looks Like
On a standard T568B wired cable (the most common standard), a passing test shows LEDs 1 through 8 lighting in perfect sequential order on both the main unit and the remote. Every LED lights, they light in order, and the numbers on the main unit match the numbers on the remote. That's it. Pass.
Common Failure Patterns
| LED Pattern | Fault Type | What Happened | How to Fix |
|---|---|---|---|
| LED does not light at all | Open | Wire is not making contact with the pin. Either it wasn't pushed far enough into the connector or it's broken. | Cut off the connector and re-terminate. Make sure all wires are fully seated against the front of the connector before crimping. |
| Two LEDs swap positions | Miswire / Reversal | Two wires are on the wrong pins. Usually means wires were placed in the wrong order during termination. | Cut off the connector, verify the pinout order, and re-terminate with wires in the correct sequence. |
| Two LEDs light at the same time | Short | Two conductors are touching each other. Can happen from over-stripped jacket, exposed copper, or a bad crimp. | Cut off the connector. Check that no bare copper is exposed outside the connector body. Re-terminate with a clean strip. |
| All LEDs light but pairs are swapped (e.g., 1-2 swap with 3-6) | Split Pair | Wires are on the correct pins at both ends but physically paired with the wrong partner wire. Passes basic continuity but causes crosstalk under load. | Re-terminate both ends. This usually means wires were arranged in the correct pin order but not from the correct twisted pairs. Review the T568B color code. |
| Main unit shows 1-8, remote shows 8-1 | Full Reversal (Crossover) | One end is wired T568A and the other is T568B, creating a crossover cable. | Re-terminate one end to match the other. For standard connections, both ends should be T568B. |
Want the LED fault chart at the bench? Get our free one-page Cable Tester Field Card — every LED pattern, what it means, and the exact fix, printable and ready to tape inside your tool case.
No spam. Unsubscribe anytime.
How to Use a Tone Generator and Probe
A tone generator and probe (sometimes called a "fox and hound" or "toner and wand") solves a different problem than a wire map tester. Instead of testing if a cable is wired correctly, it helps you find and identify cables - tracing a cable's path through a wall, identifying which cable in a bundle goes where, or locating a specific drop at a patch panel.
When You Need a Tone Generator
- Cable identification - you're standing at a patch panel with 48 cables and need to find the one that goes to the conference room
- Cable tracing - you need to follow a cable's physical path through walls, ceilings, or conduit
- Troubleshooting unknown runs - you inherited a building's cabling and nothing is labeled
Step-by-Step: Tracing a Cable
Connect the tone generator to the cable
Plug the tone generator into one end of the cable using the RJ45 jack. If the cable isn't terminated, use the alligator clips to connect to individual wires. The tone generator will put an audible signal on the cable.
Turn on the tone generator and select a tone pattern
A tone generator worth owning offers more than one tone pattern. The Digital Tone & Probe Kit ($202.66) has several, and in noisy environments with lots of cables, a distinctive pattern makes your cable easier to pick out.
Take the probe to the other end
The probe (also called the wand) is the receiver. It doesn't need to make physical contact with the cable - hold it near the cable or connector and listen for the tone. The closer you get to the correct cable, the louder the tone becomes.
Scan cables until you find the match
At a patch panel or cable bundle, slowly move the probe across the ports or cables. The probe will pick up the tone on the correct cable and be silent (or much quieter) on others. Once you identify the cable, label both ends immediately.
When You Need More Than a Wire Map Test
A wire map tester confirms that all 8 wires are connected to the right pins. That's essential, but it doesn't tell you everything about a cable's performance. Here's when you need to step up to a more capable tester.
You Need a Qualification Tester When:
- You need cable length - confirming runs are within the 100-meter Ethernet maximum, or locating where a fault is in a long run
- You need to identify multiple drops - using numbered remotes to map which port goes to which room without a second person
- You are terminating shielded cable - confirming the shield is bonded end to end, which a wire map test does not check
The VDV MapMaster 3.0 ($168.14) covers length measurement, distance to fault, multi-location identification, and shield continuity on shielded cable. What it does not keep is a record: the readings are on screen for you to write down, and nothing leaves the unit. What it does not do is read power: confirming that a camera or access point is actually drawing Power over Ethernet takes an instrument built to measure voltage and wattage on the pairs. We do not sell a tester that checks the network on the far end of the cable, so DHCP, DNS, and link negotiation stay a switch-side problem.
You Need a Certification Tester When:
- You're validating 10-gigabit capability - Cat6A installations rated for 10 Gbps need performance testing, not just continuity testing
- Your contract requires it - commercial cabling contracts often specify certification testing for all drops
- You need warranty compliance - cable manufacturers may require certification test results for extended warranty coverage
- You need to prove throughput - not just that the cable is wired correctly, but that it actually delivers the speed it's supposed to
A true certification tester is a Fluke DSX2-5000 class instrument. The tier below it is the speed certifier, which measures throughput with full reporting and covers qualification but not certification. We do not sell either one, so if the job specifies certified drops, budget for a rental or a subcontractor before you quote it. For a detailed comparison of every tester tier and when each one makes sense, read our best cable testers guide.
Recommended Testers from CrimpShop
Here's which tester to grab based on your testing needs, from simplest to most comprehensive.
Quick Pass/Fail Testing
One-button wire map testing with built-in tone generator. Pocket-sized. The tester to grab when you just need to know if your termination is good. Perfect for DIY and small installs.
Cable Tracing & Identification
Dedicated tone generation and tracing for identifying cables in walls, ceilings, and bundled runs. Adjustable volume on both the toner and the probe, multiple tone patterns, and it works on cable that is still live.
Professional Installation Testing
Full wire mapping with length measurement, distance-to-fault, multi-location testing, and an end-to-end shield check on shielded runs.
Common Cable Testing Mistakes
These are the errors that trip up beginners most often. Avoiding them will save you time and prevent false results.
Testing only one end
Plugging the cable into just the main unit without the remote tells you nothing. The tester needs both ends connected to send a signal through the cable and verify it arrives correctly. If you see LEDs light up with only one end connected, that's the tester's self-check, not a cable test.
Not testing after installation
A cable that tested fine on the workbench can fail after being pulled through walls, stapled, bent around corners, or terminated at a keystone jack. Always test the cable in its final installed state, not just before installation. The pull and the second termination are both opportunities for new faults.
Testing while connected to equipment
Running a wire map test with the cable still plugged into a switch, router, or PoE injector can produce false results and risk damaging your tester or the equipment. Disconnect both ends before testing. The only exception is a tone generator, which can be used on live cables.
Ignoring intermittent failures
If a cable sometimes passes and sometimes fails, it has a marginal connection. A wire that barely makes contact with the pin will work intermittently. This is worse than a clean failure because it will cause random network drops in production. If a cable doesn't pass consistently every time you test it, re-terminate it.
Assuming a pass means full performance
A wire map test confirms connectivity, not performance. A cable can pass a wire map test and still fail at gigabit speeds due to excessive crosstalk, cable length exceeding 100 meters, or poor-quality connectors. If you're terminating Cat6A for 10-gig, a wire map test alone isn't sufficient - you need a speed test to verify actual throughput, and a certifier if the job specifies certified 10G links. Neither instrument is one we sell, so plan how you are getting hold of one before the ceiling goes back up.
Dead batteries
Cable testers run on batteries, and a low battery can cause unreliable results - dim LEDs, intermittent readings, or outright failure to test. Replace or charge batteries before a job. A few testers show a battery indicator, but many don't. If results look inconsistent, check the battery first.
The Cable Tester Field Card
One printable page that turns any LED pattern into a diagnosis and a fix — so you stop guessing and re-terminate the right end the first time. Tape it inside your tool case and read faults in seconds.
- Every LED pattern → fault type → exact fix
- Passing reference for T568A and T568B cables
- Wire-map vs. tone-generator decision guide
No spam. Unsubscribe anytime.
Frequently Asked Questions
How do I know if my cable passed the test?
On a wire map tester, a passing cable lights LEDs 1 through 8 in sequential order on both the main unit and the remote. All 8 LEDs light up, they light in order (1-2-3-4-5-6-7-8), and there are no extra or missing lights. If any LED is missing, out of order, or lights up on the wrong side, the cable has a fault that needs to be fixed.
Do I need to test both ends of the cable?
Yes. A cable tester works by sending a signal from the main unit through each wire and detecting it at the remote on the other end. You must plug both ends in to get a valid test result. Testing only one end checks nothing - it just confirms the tester itself is working.
What does it mean when an LED does not light up during a cable test?
A missing LED means that specific conductor has no continuity - it's an open circuit. The wire is either not making contact with the pin inside the connector, or it's broken somewhere along the cable run. The most common cause is a wire that wasn't fully seated into the RJ45 connector before crimping. Re-terminate the end where the fault is most likely and test again.
Can I test a cable that is already plugged into a switch or patch panel?
You should not run a wire map test on a cable that is plugged into active network equipment. The tester sends its own signal through the wires, and having the cable connected to a switch or router can produce incorrect results and may potentially damage the tester or the equipment. Always disconnect both ends before running a wire map test. For identifying live cables without disconnecting them, use the Digital Tone & Probe Kit instead, which works on cable that is still carrying signal.
What is the difference between a cable tester and a tone generator?
A cable tester verifies that all 8 wires are connected to the correct pins and detects faults like opens, shorts, and miswires. A tone generator puts an audible signal on a cable so you can trace its physical path and identify it among other cables using a probe. They solve different problems: a tester tells you if the cable works, a toner tells you where the cable goes. Some tools like the LanSeeker ($80.08) combine both functions in one device.
Get the Right Tester for Your Work
Whether you need a quick pass/fail check or a record of length, faults, and identification on every drop, we carry the tester for it. Speed certification and TIA certification take a separate instrument that we do not sell.