The Quick Answer
A shielded patch cable looks similar to unshielded on the outside, but it has two extra elements that need to be terminated correctly: a continuous foil shield wrapped around the four pairs and a small uninsulated drain wire that runs alongside the shield. Both have to make solid contact with the metal shroud of a shielded RJ45 connector. Get this right and the cable performs to spec. Get it wrong and the shield is electrically dead.
What You Need
Materials
- Stranded Cat6A STP or F/UTP cable in the desired length
- Shielded RJ45 connectors rated for Cat6A (two per cable)
- Strain reliefs (boots) matched to the connector
Tools
- Cable jacket stripper with adjustable depth
- Diagonal cutters or flush cutters
- Crimp tool compatible with shielded RJ45 connectors
- Cable tester with shield continuity verification
For connectors, the Cat6A/7 Shielded Connector is a pass-through-style shielded plug that handles Cat6A and Cat7 cable. For crimping shielded connectors, the PTS PRO Universal Crimp Tool is the right choice. Strain reliefs are available as Cat6 Strain Reliefs in matching colors so you can label cable ends visually.
Step 1: Cut and Slide on the Boot
Cut the cable to the length you need. Add a few inches of slack to allow for stripping and trimming on both ends. A cable that ends up an inch short after termination is wasted material.
Slide a strain relief boot onto the cable before you do anything else. This is the single most-skipped step in the entire process and it cannot be fixed later. Once the connector is crimped, the boot will not fit over the connector body. Slide both boots on now, push them well back from the ends so they are out of the way during termination, and remember to slide them up onto the connector after crimping.
Match the boot color to your job's labeling scheme. Different colors at each end let you trace the cable visually in a patch panel without using a tone generator.
Step 2: Strip the Outer Jacket
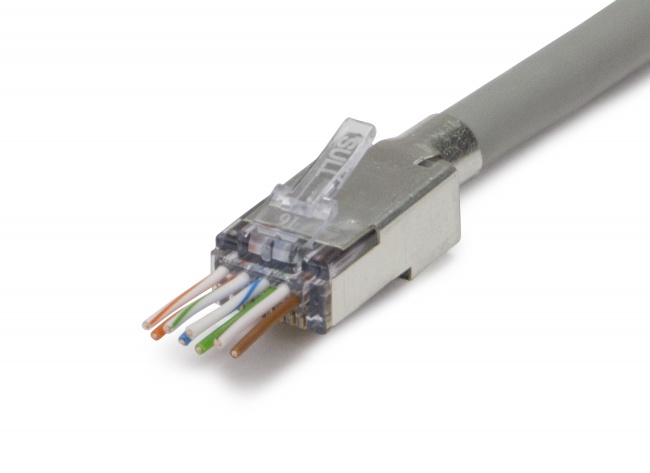
Strip approximately 1.25 inches (32mm) of outer jacket. Use a stripper with depth control because the jacket on shielded cable often has a foil layer immediately beneath it, and a deep cut will damage the foil before you have a chance to work with it.
What you should see after stripping
Underneath the jacket you will find:
- Metallic foil shield: A thin foil wrap (often aluminized polyester) covering the entire bundle of pairs.
- Drain wire: A small uninsulated copper wire running alongside the foil. The drain wire is in continuous contact with the conductive side of the foil along the length of the cable.
- Pair separator: A plastic spline or cross-shaped separator on Cat6A cable, sometimes wrapped in additional foil.
- Four twisted pairs: The eight signal conductors arranged in pairs, identical to unshielded cable.
For F/FTP cable each pair has its own additional foil wrap. For S/FTP it adds an outer braid shield over the foil. The technique is similar but with extra trimming steps for the per-pair foils.
Step 3: Prepare the Shield and Drain Wire
This is where shielded termination differs from unshielded and where most installers get it wrong. The goal is to fold the foil and drain wire back onto the outside of the jacket so they form a contact surface for the metal shroud of the connector.
Fold back the foil
Carefully tear or cut the foil down to the jacket edge, then fold it back against the outside of the cable jacket so the conductive side faces outward. The folded foil should extend about a quarter inch back along the jacket. If the foil rips, use diagonal cutters to trim the ragged edge cleanly. A clean fold makes for solid contact with the connector shroud.
Fold back the drain wire
The drain wire should also fold back along the outside of the jacket, on top of or alongside the folded foil. Together they form a 360-degree conductive band around the jacket exactly where the connector's metal shroud will clamp down.
Some installers cut the drain wire flush instead of folding it back. This works if the connector design relies entirely on foil contact, but most shielded RJ45 designs expect both the drain wire and the folded foil to be present. Read the connector instructions for your specific brand.
Step 4: Trim the Separator and Untwist the Pairs
Cut the central separator flush with the jacket edge. On Cat6A, the separator is bulky and can prevent the conductors from seating properly inside the connector if it is not removed.
Untwist each pair just enough to lay the wires flat for arrangement. The 568 specification limits untwist length to 0.5 inches at the termination. Less is better. Excessive untwist increases NEXT and is one of the easiest ways to fail Cat6A speed certification.
Step 5: Arrange Conductors in T568B Order
Lay the eight conductors flat in T568B order:
T568B Pin Order
- 1: White/Orange
- 2: Orange
- 3: White/Green
- 4: Blue
- 5: White/Blue
- 6: Green
- 7: White/Brown
- 8: Brown
Patch Cable Rules
- Both ends use the same standard
- T568B is the dominant convention in commercial work
- Crossover wiring is obsolete on modern Auto-MDIX equipment
- Match the standard used elsewhere on the job
- Document the standard on a label
For more on the standards, see our T568A vs T568B guide.
Step 6: Insert and Crimp
For pass-through-style shielded connectors like the Cat6A/7 Shielded, insert the eight conductors into the connector with the colors in T568B order. The wires should pass through the front of the connector and emerge on the contact side. Verify the order is correct before you crimp; pass-through gives you one final visual check.
Slide the metal shroud over the connector body. The shroud should clamp down on the folded foil and drain wire on the jacket. Some shielded connectors have the shroud as a separate piece you slide on; others have it integrated into the connector. Read the manufacturer's diagram before starting and follow it.
Crimp with the right tool
Use the PTS PRO Universal Crimp Tool or another crimper rated for shielded Cat6A connectors. The crimp must close both the standard contact area (which seats the eight contact blades into the conductors) and the shield clamp area (which compresses the metal shroud onto the folded foil and drain wire).
Complete the full ratchet cycle. Do not release early. The shield clamp area requires more force than a standard unshielded crimp, and an incomplete cycle leaves the shield connection loose.
Step 7: Slide the Boot Up and Repeat
Slide the strain relief boot up onto the connector body. The boot snaps over the latch and the rear of the connector. This protects the latch from snagging during use and provides a secondary strain relief for the cable jacket.
Repeat the entire process on the second end of the cable. Use the same standard (T568B) and the same connector model on both ends.
Step 8: Test Wire Map and Shield Continuity
Plug both ends into a tester that supports shielded cables. The tester runs a standard 8-pin wire map plus a shield continuity test. Both must pass.
| Test Result | What It Means | Likely Cause |
|---|---|---|
| Wire map fail (open) | One conductor not connected | Wire didn't seat in contact; recrimp |
| Wire map fail (split pair) | Pairs assigned to wrong twists | Wrong color order; redo termination |
| Shield fail (open) | Shield not continuous end-to-end | Foil/drain not folded back, or shroud not clamped |
| Shield short | Shield touching a conductor | Stray drain wire inside connector body |
| Speed test fail | Cannot link at 10 Gbps | Termination quality, untwist length, or cable damage |
For full Cat6A certification, run a speed test with a Net Chaser Ethernet Speed Certifier. The Net Chaser confirms the cable establishes a 10 Gbps link and transmits test traffic with zero bit errors. If the shield shows open but wire map passes, the cable will probably still pass speed certification in a clean environment, but it will fail in a noisy one.
Common Failure Modes
Loose shroud crimp
If the metal shroud is loose around the cable jacket, the shield bond is unreliable. Cable movement breaks the connection intermittently. The fix is either a complete recrimp or starting over with a fresh connector. Quality crimp tools with proper ratchet cycles eliminate this problem.
Drain wire stuck in a contact
If a stray drain wire ends up in the conductor channel of the connector, you will get a short between the shield and one of the data pins. This kills the cable. Trim the drain wire cleanly during preparation and verify it stays on the outside of the jacket.
Foil tear-through
If the foil tore unevenly during stripping and the shroud is not making contact along its full circumference, the shield is partially open. Strip carefully and inspect the foil before assembly. If it is torn, cut the cable back an inch and start over.
When to Build vs Buy Patch Cables
Shielded patch cables are available pre-made in standard lengths. The case for building your own:
- Custom length: A 7-foot cable in a tight rack run is much cleaner than a 10-foot cable with three feet of slack.
- Color labeling: Mix boot colors per circuit type, building, or VLAN for visual identification.
- Cost on long runs: Custom 25-foot or 50-foot cables save money vs pre-made.
- Out-of-stock workaround: Building on demand means you are never waiting on a vendor.
The case for buying pre-made: short standard lengths (1, 3, 5 feet) are usually cheaper to buy than to build, and factory cables are often factory-tested. For high-volume sites, a mix of bought standard lengths and custom-built specials is the typical approach.
Recommended Products
Shielded Connectors
Pass-through and standard shielded RJ45 connectors
Use Cat6A/7 Shielded for Cat6A patch cables. The shielded EZ-RJ45 Cat6 covers shielded Cat6 work.
Crimp Tools
Crimp tools rated for shielded connectors
The PTS PRO universal handles shielded plus unshielded connectors and the full EZ-RJ45/ezEX family.
Testing
Verify wire map, shield continuity, and 10 Gbps speed
The Net Chaser tests shield continuity along with wire map, length, skew, and 10 Gbps speed.
Related Articles
Frequently Asked Questions
Why use a shielded Cat6A patch cable instead of unshielded?
Shielded Cat6A blocks external electromagnetic interference and prevents alien crosstalk between adjacent cables. In high-density patch panels, near electrical equipment, or in industrial environments, the shield is what keeps 10 Gigabit links stable. Unshielded Cat6A works in clean environments, but shielded is the safer choice for any noisy installation.
Do I need stranded or solid Cat6A for a patch cable?
Use stranded Cat6A for patch cables. Stranded conductors flex without breaking, which matters for cables that get plugged and unplugged or routed through tight bends. Solid conductor cable is for horizontal runs inside walls and is too brittle to survive repeated movement at the connector.
How does the shield connect inside a shielded RJ45 connector?
A shielded RJ45 has a metal shroud that wraps around the plastic connector body. Inside the connector, the cable's drain wire and foil shield are folded back onto the cable jacket so they make 360-degree contact with the metal shroud when the connector is crimped. This bonds the cable shield to the connector shield, which then bonds to the chassis of the powered equipment when plugged in.
Can I mix shielded connectors on unshielded cable?
You can physically crimp a shielded connector onto unshielded cable, but you lose the benefit of the shielding because there is no continuous shield path. The shield only works if it runs unbroken from one end of the cable to the other and bonds at both ends. Match shielded cable to shielded connectors and shielded jacks throughout the channel.
How do I test a finished shielded patch cable?
Run a wire map test on a tester that supports shielded cables. The Net Chaser reports a separate pass/fail for shield continuity along with wire map. If the shield shows open, you have a bad bond at one end of the cable. For Cat6A speed certification, the Net Chaser confirms the cable runs at 10 Gbps end-to-end.
Build Cat6A Shielded Cables That Pass Cert
Stock shielded RJ45 connectors and the crimp tools that handle them. Build clean patch cables in any length and verify with a Net Chaser.